Chrome allows for the use of multiple user profiles. If you don’t have multiple user profiles set up in Chrome, then your settings and installed extensions are associated with the Default profile.
Category:
- All Categories
- Support Topics
- Uncategorized
The Session Buddy console provides tools for diagnosing and troubleshooting problems.
If an issue occurs, the console may display error messages that can help Session Buddy support identify the problem.
How to access the console:
- Open a Session Buddy tab by clicking the Session Buddy icon in the browser toolbar.
- With Session Buddy as the active tab, open Chrome’s menu, go to “More tools“, and select “Developer tools“.
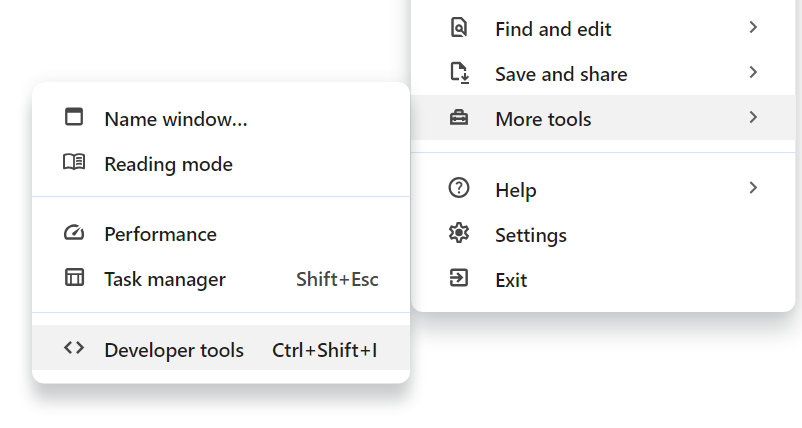
This will open the Developer Tools in a new window or pane. - In Developer Tools, select the Console tab to view recent Session Buddy activity or error messages.
- Some entries have an arrow on the left—click it to reveal additional details.
Alternative instructions
To access the console when Session Buddy won’t open, go to the following URL:
chrome://extensions/?id=edacconmaakjimmfgnblocblbcdcpbko
Ensure that “Developer mode” is toggled on in the upper-right corner of this page, then click the service worker link under “Inspect views“.
This will open the Developer Tools in a new window. Select the Console tab in this window to view recent Session Buddy activity or error messages.
Note that console commands and local storage editing are not available when opening the console this way.
Sharing console information
When sharing console information with Session Buddy support, provide either:
- A screenshot of the console with entries fully expanded, or
- A copy/pasted version of the console’s text. Right-click inside the console, then select either “Copy console” or “Save as…”
Console commands
The Session Buddy console includes some helpful commands. Type the command and hit ENTER to execute it.
saveData()
Downloads a file containing all collections and history. This can be useful if Session Buddy won’t open.
saveDiagnostics()
Downloads a file with diagnostic information that can help Session Buddy support get a better idea about the issue you’re experiencing.
repair()
Scans collections and history and repairs any data inconsistencies it finds. Reports on any issues detected and repaired.
debug()
Puts Session Buddy into debug mode.
debug(false)
Takes Session Buddy out of debug mode.
Import and export are a pair of complimentary features that make it easy to share collections between Session Buddy and other applications, including Session Buddy on other devices.
Importing collections
The Import feature enables you to create collections using files from other applications or text copied from emails, chats, documents, or web pages.
Session Buddy supports a wide array of input formats, ranging from simple lists of URLs to structured JSON representations.
To import collections:
- Open the Import Dialog: Click the gear icon in Session Buddy and select “Import…” from the dropdown menu.
- Provide the Data: Paste the text or drag and drop a file containing collections into the designated area.
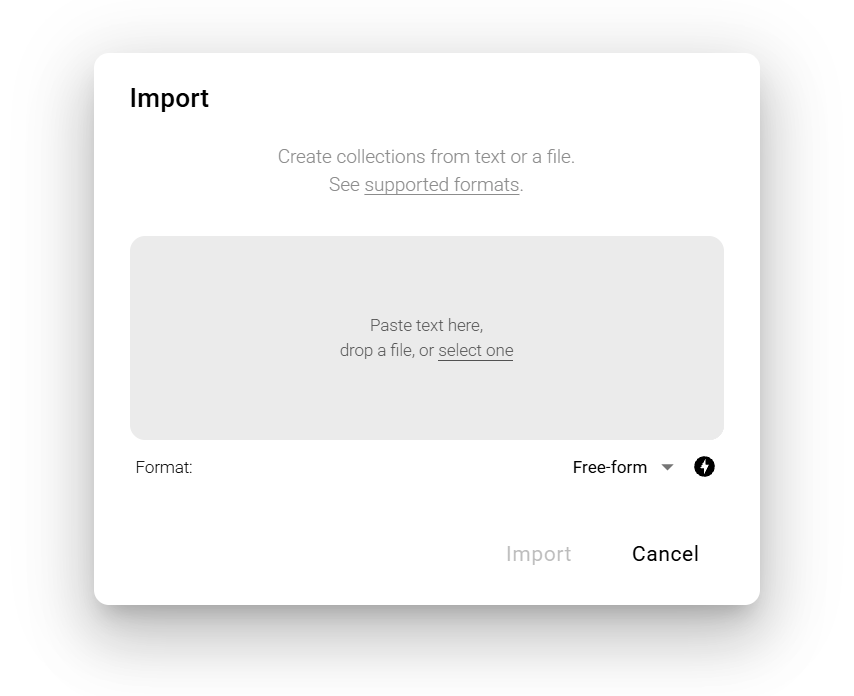
Session Buddy will automatically detect the format of the provided data and update the format selector accordingly. If the format isn’t recognized, it defaults to “Free-form“.
You can edit the text before finalizing the import and the detected format will adjust as you make changes. To disable automatic format detection, select a specific format or click the lightning icon next to the format selector.
Before proceeding with the import, ensure that the detected format and reported collection count match your expectations. If Session Buddy guessed the format incorrectly, select the desired format from the Format dropdown.
For a comprehensive list of supported import formats, refer to the Formats page.
Adding links and opening tabs
Beyond importing entire collections, Session Buddy allows you to add individual links to existing collections or open multiple tabs simultaneously.
Adding Tabs or Links from text:
- Click the “Add tabs…” or “Add links…” button in the content header.
- This opens a dialog similar to the Import feature, enabling you to add tabs or links using various supported formats.
Using Copy/Paste:
- Copy selected tabs or links and paste them across collections or into the current session as needed.
Exporting collections
The Export feature allows you to share your Session Buddy collections with other people or applications like note-taking apps, AI agents, spreadsheets, or other Session Buddy instances. Multiple export formats are available to suit various use cases.
To export collections:
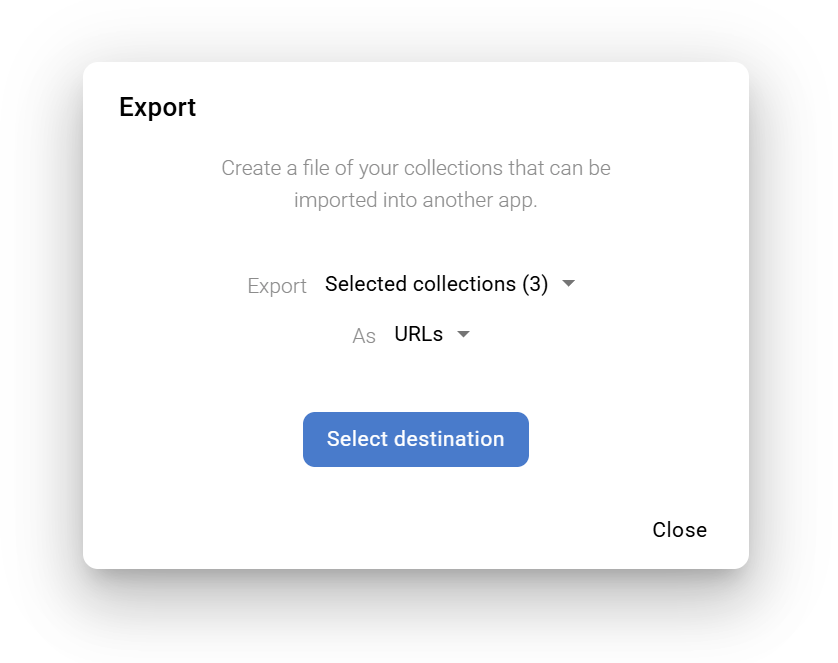
- Open the Export Dialog: Click the gear icon in Session Buddy, then select “Export…” from the dropdown menu.
- Choose Collections: Decide whether to export all collections or only the selected ones.
- Choose Format: Select the desired export format from the available options.
- Save the Exported File: Click “Select destination” to choose the location and filename for the export. If your browser doesn’t support location selection, the button will read “Download” and the file will be saved to your default downloads folder.
For detailed information on the available export formats, visit the Formats page.
Exporting links and tabs
Export is focused on collections. If you want to extract individual tabs or links, you can select and copy/paste them into other applications like text editors, chats, or emails.
To enable various copy formats, go to Settings, select the “Other” tab, and edit the list of “Extra copy formats“.
Differences between Import/Export and Backup/Restore
While both Import/Export and Backup/Restore facilitate data management in Session Buddy, they serve distinct purposes:
Import/Export
- Designed for sharing collections between Session Buddy and other applications or people.
- Handles only collections, not history.
- Importing always creates new collections, which may lead to duplication if the same file is imported multiple times.
- Importing removes pins from collections.
Backup/Restore
- Aimed at safeguarding your data from potential browser issues that could result in data loss.
- Facilitates re-installing Session Buddy.
- Includes both collections and history.
- Restoring only creates collections that haven’t been previously restored, preventing duplication.
- Restoring preserves pinned collections.
Session Buddy stores collections and history in folders on your device. To find them, see Locate Session Buddy Data on Your Device.
In most cases there will be two folders, but if you don’t have many collections there may be only a single folder.
It’s recommended that you include these folders in your system backups for an extra layer of protection (in addition to regularly backing up through Session Buddy’s Backup/Restore feature).
It may also be necessary to manually back up these folders during troubleshooting in case Session Buddy won’t open.
Back up local data
To set up automated local data backups, ensure that the data folder paths are included in your scheduled system backups (Windows Backup, Time Machine, or a third-party backup solution).
To manually back up local data, use Windows’s File Explorer or Mac’s Finder to copy the data folders to a safe location, such as a Documents folder, Dropbox, or an external drive.
Restore local data
To restore Session Buddy data using data folders recovered from a backup, follow the steps below.
Please note that for successful restoration, the entire contents of the data folders must be restored.
Also note that these steps will replace all Session Buddy data. If you currently have collections and history that you want to keep, use Session Buddy’s Backup to first back them up and then Restore them after completing these steps.
1. Backup Current Data: Create a backup to ensure you have a copy of any collections or history created since the incident. Go to Session Buddy’s gear menu, then select “Backup“.
2. Close the Browser Completely: Ensure all browser processes are terminated
 On Windows: Close all browser windows. Then check the tool tray for the browser icon. If it is present, right-click it and click “Exit“.
 On macOS: Press
 Cmd+Q to quit the browser. Then check the Dock for the browser icon. If it’s still there, right-click and choose “Quit” if available.
3. Access Session Buddy Data Folders: Navigate to the location where Session Buddy’s data is stored using Windows’s File Explorer or Mac’s Finder
4. Replace Data Folders: Delete the existing data folders, then copy in the recovered folders in their entirety
As a safer alternative to deletion, you can move the existing folders to another location like Documents or rename them by appending something like “-backup”.
5. Restart the Browser: Launch your browser and confirm that your Session Buddy collections and history have been successfully restored
6. Restore Recent Data: Use the Restore feature to re-import any data backed up in step 1
Session Buddy offers a Backup and Restore feature that:
- Safeguards your collections and history, allowing recovery from data loss due to unforeseen browser issues or system malfunctions
- Facilitates seamless data transfer should re-installing Session Buddy be necessary, such as when setting up a new computer
It’s highly recommended that you use this feature to create regular backups.
Creating a Backup
To back up your Session Buddy data to a file that includes all your saved collections and history:
- Click the gear icon within Session Buddy.
- Select “Backup” from the dropdown menu.
- In the Backup dialog, click “Select destination” to choose the location and filename for the backup.
If your browser doesn’t support location selection, this button will read “Download” and the file will be saved to your default downloads folder. - Wait for backup to complete. The final count of collections and history events backed up will be displayed once the backup file is created.
You can perform backups as often as you like. Each operation creates a new backup file.
Restoring Data from a Backup
To recover collections and history from a backup file:
- Click the gear icon in Session Buddy.
- Select “Restore” from the dropdown menu.
- In the Restore dialog, drag and drop your backup file into the designated area.
- Once dropped, Session Buddy will review the file and let you know how many collections and history events were found.
- Click the “Restore” button to proceed.
- Once restore completes, you can close the dialog. After you do so, newly-added collections will appear in the navigation sidebar.
Since restore adds only the collections and history events that haven’t already been restored, the same backup file can be restored multiple times without the risk of creating duplicates.
For more about restore, see Restore.
For more advanced backup and restoration procedures, refer to Back Up and Restore Local Data.